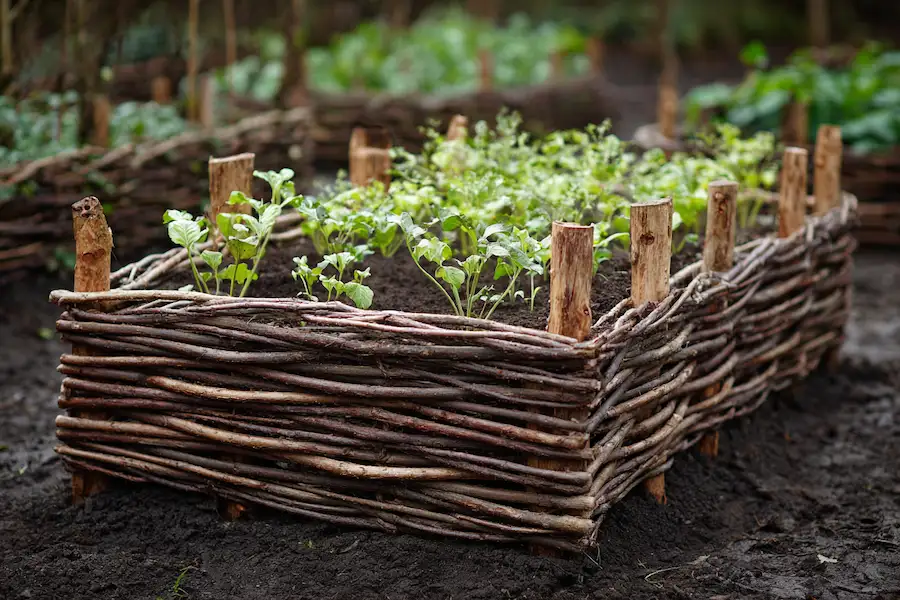
Wattle Garden Beds: A Natural, Durable Raised Bed You Can Build Yourself
A wattle garden bed is a growing bed edged (or fully “walled”) with woven branches wrapped around sturdy wooden stakes. It’s one of the oldest garden-building methods in the world—and it still works because it’s cheap, flexible, attractive, and practical. You can build it from prunings, coppiced sticks, and locally available wood, then fill it with rich soil for a productive, tidy garden space.
Below is a complete, image-free guide covering the best materials, how to build it step by step, and tips that make wattle beds last longer and grow better.
Why Wattle Beds Work So Well
Wattle beds give you the benefits of a raised bed while using mostly natural materials:
- Better structure and drainage than flat ground (especially in heavy soils).
- Clear borders that hold compost and mulch in place.
- Flexible shapes (straight, circular, keyhole, curved beds).
- Low cost if you use prunings and small timber.
- Easy repairs—you can replace one stake or weave section without rebuilding everything.
Best Materials for a Strong, Long-Lasting Wattle Bed
1) Stakes (the “posts”)
Stakes do the heavy work. They resist pressure from soil and keep the weave tight.
Ideal stake qualities:
- Rot-resistant wood
- Thick enough not to bend
- Straight grain
Great woods for stakes (durable choices):
- Black locust / acacia (very rot-resistant)
- Chestnut (excellent outdoors)
- Oak (durable, especially heartwood)
- Larch (better than many softwoods)
- Hazel (good if thick and replaced occasionally)
Stake size guide:
- Diameter: 4–8 cm (thicker = longer-lasting)
- Length: depends on bed height
- For a 30–40 cm bed, use 80–100 cm stakes (you’ll bury a solid portion).
- Plan to bury 25–40 cm into the ground (more in sandy soil).
Avoid for stakes (unless you accept short lifespan):
- Thin stakes under 3–4 cm diameter
- Very soft, fast-rotting wood (many poplars, some pines) unless you’re okay with frequent replacement
2) Weavers (the “rods” you weave)
Weavers are the flexible branches woven between stakes.
Best weaver materials:
- Willow (most flexible; excellent for tight curves)
- Hazel (strong; slightly less flexible than willow)
- Dogwood (flexible and tough)
- Young shoots from many shrubs/trees if they bend without snapping
Weaver thickness:
- 1–2 cm is ideal for most beds
- Use thicker rods on the first few courses for strength
Fresh vs. dry:
- Fresh (“green”) rods weave easiest.
- Dry rods can work if soaked in water (often 24–72 hours) until pliable.
3) Optional, Helpful Extras
These aren’t required, but they improve performance:
- String line + pegs (for layout)
- Mallet or post driver (driving stakes)
- Pruning saw / loppers (clean cuts)
- Work gloves (protect hands from splinters)
- Cardboard (weed-smother layer under the bed)
- Mulch (straw, shredded leaves, wood chips for paths)
- Compost + topsoil (for filling)
Important caution:
Avoid pressure-treated wood anywhere near edible beds unless you’re certain it’s food-safe for garden use. With wattle beds, you can stay fully natural and skip that risk entirely.
Planning Your Wattle Bed for Success
Choose a good site
- Sun: most vegetables want 6–8+ hours of sun
- Drainage: avoid spots where water pools after rain
- Access: keep beds narrow enough to reach the center without stepping in
Best dimensions
- Width: 90–120 cm (easy to reach across)
- Length: whatever fits your space (2–4 m is common)
- Path space: 40–60 cm minimum (wider if you use a wheelbarrow)
- Height options:
- Low edge (10–20 cm): great as a border and soil-holder
- Medium raised (25–40 cm): most common and practical
- Tall raised (50–70 cm): more materials, but easier on your back
How to Build a Wattle Garden Bed (Step-by-Step)
Step 1: Mark the shape
Use string and stakes (or a hose for curves). Check the layout from multiple angles so it looks balanced.
Step 2: Prepare the ground
- Mow short or remove tall weeds.
- If grass is thick, you can:
- Remove sod, or
- Leave it and plan to lay cardboard inside the bed later as a weed barrier.
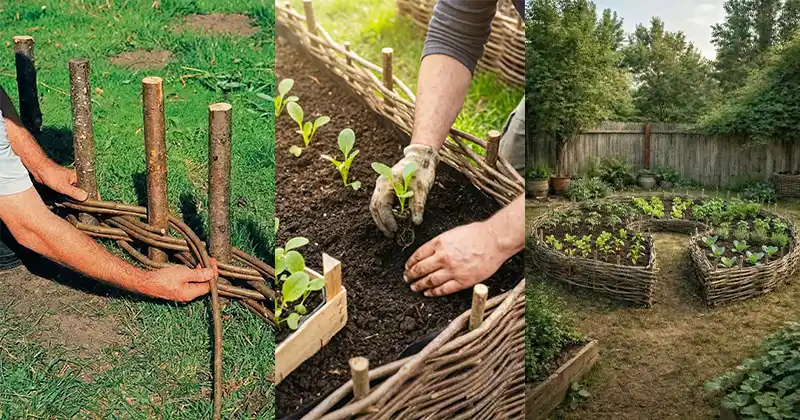
Step 3: Drive in the stakes
- Place stakes 20–30 cm apart (closer spacing makes weaving easier and sturdier).
- Push or hammer stakes 25–40 cm into the soil.
- Make corners strong:
- Use thicker corner stakes, or
- Place double stakes at each corner, very close together.
Tip: If the soil is very hard, pre-make holes with a metal bar or a thin stake first.
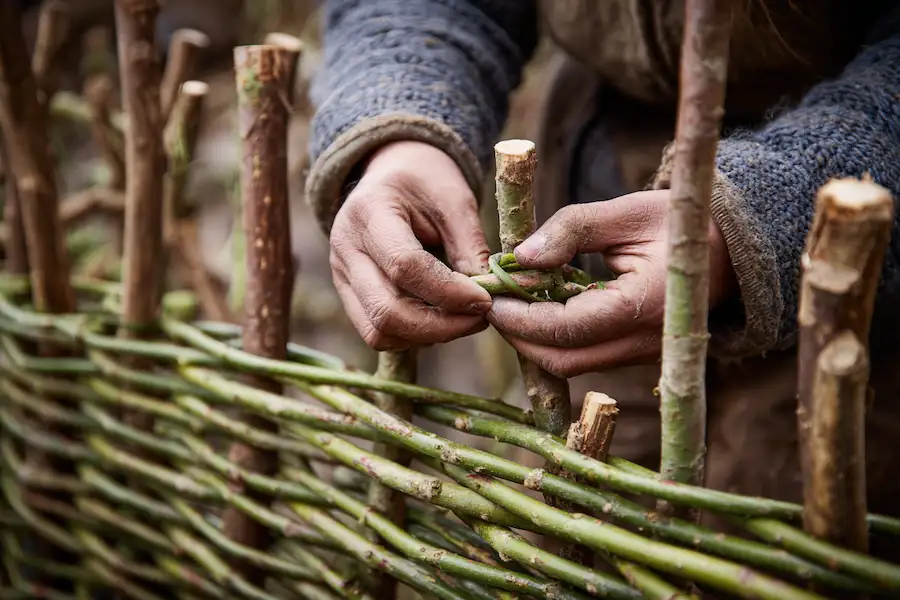
Step 4: Start weaving the first courses
- Begin with thicker, stronger rods on the bottom rows.
- Weave in front of one stake, behind the next, alternating as you go.
- After every full lap/length, push the weave down firmly to tighten it.
Key strength rule:
A wattle wall is strongest when the weave is compressed. Loose weaving bulges and weakens.
Step 5: Join rods correctly (so it doesn’t unravel)
When a rod ends:
- Overlap the next rod by at least one stake gap
- Stagger joins so they don’t all line up in one vertical “weak spot”
- Tuck the end around a stake so it locks in place
Step 6: Build up to your final height
Keep weaving until you reach the desired height. Trim or tuck ends neatly.
For taller beds (40 cm+):
- Add a second row of stakes outside the first row in key areas (like a “buttress”) if the wall begins to bow.
- Or install a few cross ties (a strong rod running across and tied to stakes) to resist outward pressure.
Step 7: Line the inside (optional but very useful)
For weed control and cleaner soil layers:
- Lay cardboard inside (overlapping edges).
- Wet it so it settles.
- This suppresses grass and breaks down over time.
Step 8: Fill the bed the right way
A simple, high-performing fill (for most vegetables):
- 40% topsoil
- 40% compost
- 20% aeration (leaf mold, aged fine wood chips, coarse compost, or similar)
If compost is very rich, you can reduce it slightly and add more soil. Mix lightly—don’t pulverize structure.
Step 9: Water deeply and mulch
- Water the filled bed thoroughly to settle it.
- Add mulch on top to protect moisture and reduce weeds (straw, shredded leaves, fine bark, etc.).
Growing Tips for a Successful Wattle Bed Garden
1) Don’t step in the bed
Wattle beds work best when soil stays fluffy. Compaction kills drainage and root growth. Keep paths clear and reachable.
2) Mulch the paths too
A mulched path:
- Prevents weeds
- Keeps mud away
- Helps you work after rain
- Makes the whole garden look finished
3) Plant in blocks, not single rows
In raised beds, “block planting” often produces better yields:
- Less wasted space
- Better shade for soil
- Fewer weeds once plants fill in
4) Water smarter
Raised beds can dry faster than ground beds.
- Water deeply (not a daily sprinkle).
- Mulch is your best friend for moisture stability.
- If you can, use soaker hoses or slow watering at the base.
5) Feed the bed every season
Wattle beds shine when you maintain fertility:
- Add 2–5 cm compost on top each season
- Keep soil covered (mulch or living plants)
- Rotate crops: leafy → fruiting → roots → legumes (simple rotation helps)
How to Make Wattle Beds Last Longer
A wattle bed is naturally “replaceable,” but you can extend its life a lot:
- Use rot-resistant stakes (this matters more than weaver choice)
- Char the buried end of stakes (light charring helps slow rot)
- Keep the top of the wattle not constantly wet (avoid piling wet mulch against the outer wall)
- Expect weavers to age first—stakes are the “skeleton”
- Plan a quick refresh every few seasons: add new rods to the outside or re-weave thin sections
Typical lifespan (very rough guide):
- With average wood: 2–5 years
- With durable stakes (locust/chestnut/oak heartwood): 5–10+ years
- With willow weavers: often easier repairs, even if parts age sooner
Common Mistakes to Avoid
- Stakes too far apart → weaving becomes loose and weak
- Rods too dry → snapping and frustration
- Corners not reinforced → walls shift and bow
- Bed too wide → you step in it and compact soil
- Skipping mulch → watering becomes harder and weeds explode
A wattle gardening bed is one of the most satisfying garden builds because it’s both functional and beautiful—and it turns “yard waste” (prunings and sticks) into a productive structure. Build it tight, choose strong stakes, fill it with living soil, and you’ll have a bed that improves each season.