Master the Art of Fruit Tree Pruning: Healthier Trees and Bigger Harvests
When you look at a dormant fruit tree in the middle of winter, taking a pair of sharp shears to its branches can feel intimidating. Many gardeners worry about hurting the tree or ruining the harvest. But pruning is not about making a tree look neat and tidy—it is a vital health intervention.
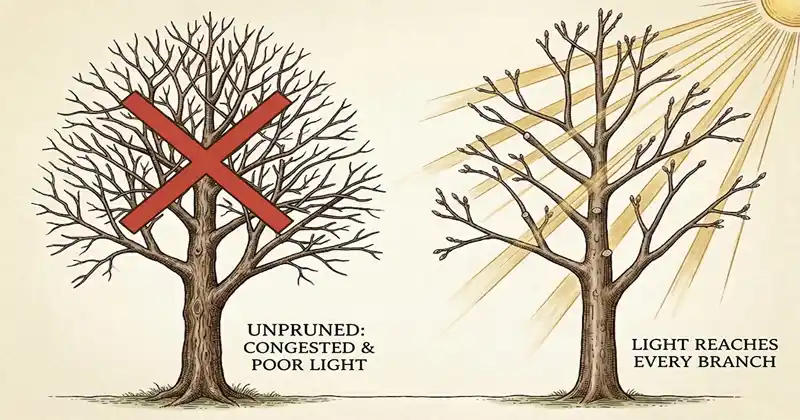
Proper pruning directs the tree’s energy, channels sunlight into the core of the canopy, and ensures life-saving airflow. When done correctly, this practice translates to sweeter, larger fruit and drastically fewer pest and fungal issues throughout the growing season.
Whether you are growing apples in a temperate valley or tending to peaches in a milder climate, the principles of pruning remain universal. Here is how to prune your fruit trees for long-term success.
Timing is Everything: The Universal “Bud-Swell” Rule
Forget calendar dates and regional climate zones. The biological clock of your tree is the only calendar you need. The universal window for winter pruning is during full dormancy, specifically in late winter just before “bud swell.”
You want to prune when the buds on the branches are beginning to plump up but show absolutely no green tissue. Pruning during this window ensures that the harshest winter freezes have passed, reducing the risk of cold damage to fresh cuts, but it gets the job done before the tree’s sap begins to flow and it wastes energy on wood you are just going to remove anyway.
Step 1: The 3 D’s — Do This First
Before you start shaping the tree, you must perform a visual health check. Every winter, your first cuts should be to remove all Dead, Diseased, and Damaged wood.
Look closely at the bark and joints for splitting or rot. This step alone is one of the most effective pest management strategies you can employ. Fungal spores and overwintering pests often hide in split bark and rotting wood. Removing the 3 D’s solves a massive portion of your seasonal problems before spring even arrives.
Step 2: Choose Your Tree’s Architecture
Fruit requires direct sunlight to ripen and develop complex sugars, while the tree’s leaves require excellent airflow to dry off quickly after rain to prevent fungal infections. To achieve this, you must train your tree into a specific shape.
The three primary structures are the Open Center, the Central Leader, and the Modified Central Leader. Your choice depends heavily on the type of fruit you are growing.
1. The Open Center (The “Vase” Shape)
- Best for: Stone fruits (peaches, plums, nectarines, apricots, cherries).
- The Structure: Think of a wide, open bowl. This shape completely removes the central, upward-growing trunk of the tree at about two to three feet off the ground. From that short main trunk, 3 to 5 strong branches (scaffolds) are allowed to grow outward and upward at a 45-degree angle.
- Why it works: Stone fruits thrive on maximum sunlight reaching the interior of the tree. By hollowing out the center, light and air easily penetrate the canopy, and the overall height of the tree is kept low, making harvesting significantly easier. To maintain this, you must constantly prune away any new branches trying to grow straight up into the empty center bowl.
2. The Central Leader (The “Pyramid” Shape)
- Best for: Apples, pears, and pecans.
- The Structure: Think of a classic pine or Christmas tree. This shape relies on one strong, dominant vertical trunk (the leader) that grows straight up through the center of the tree. Horizontal branches are encouraged to grow off this main trunk in staggered “tiers,” with the widest branches at the bottom and progressively shorter branches at the top.
- Why it works: This mimics the natural growth habit of apples and pears, providing incredible structural strength to hold up heavy fruit loads. You maintain this by ensuring the central trunk is always the tallest point and pruning the lateral branches so the upper tiers do not shade out the lower tiers.
3. The Modified Central Leader (The “Hybrid”)
- Best for: Walnuts, heavily vigorous apple varieties, and sometimes pears.
- The Structure: This is a compromise between the first two methods. You start by training the tree as a Central Leader for the first four to five years to develop a strong, tall trunk. However, once the tree reaches a desired height (usually around 6 to 8 feet), you cut off the top of the central leader.
- Why it works: It provides the immense structural strength of a central trunk at the base, but by capping its height, you force the tree to open its upper canopy, allowing more light in than a strict pyramid shape while keeping the tree at a manageable height.
Step 3: Eliminate the “Energy Thieves”
As you inspect the branches, you will likely notice thin, highly vigorous shoots growing straight up toward the sky. These are known as water sprouts.
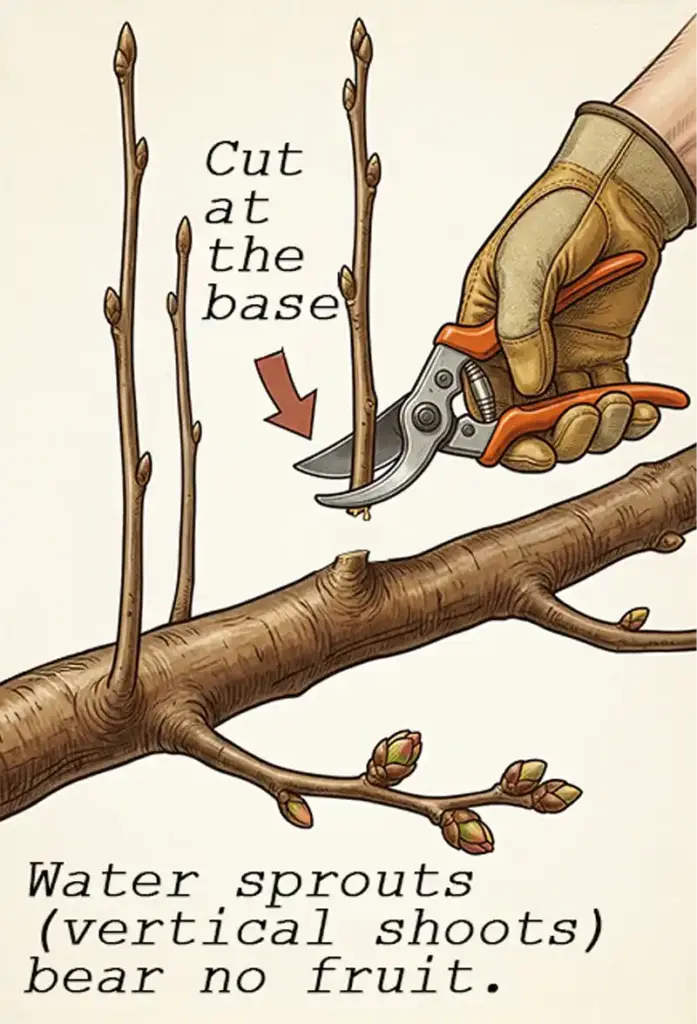
Water sprouts produce absolutely no fruit. Instead, they act as parasites, draining vital energy and nutrients away from the productive, fruiting wood. Cut these vertical shoots flush against the branch they are sprouting from. If you leave a stub, they will simply grow back with a vengeance.
Step 4: Understanding the Cuts — Heading vs. Thinning
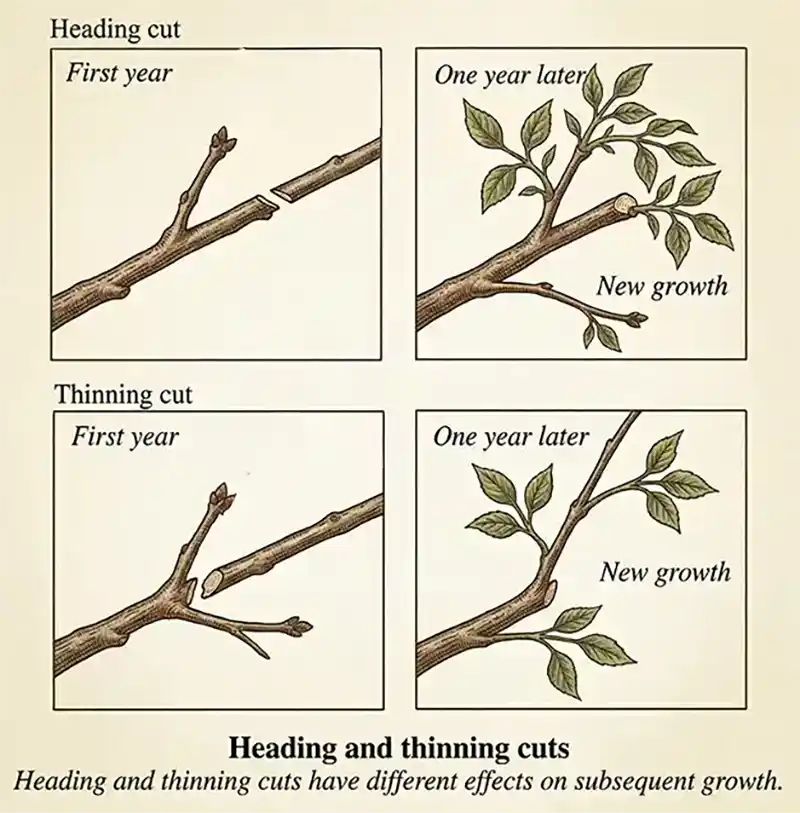
The most common mistake home orchardists make is making the wrong type of cut. Understanding the difference between heading and thinning will completely change how your tree grows.
- Heading Cuts: This involves snipping off the tip of a branch. Heading cuts trigger a localized hormonal response in the tree, causing a dense, bushy cluster of new branches to sprout just below the cut. While useful for stimulating growth in young branches or stiffening a floppy limb, heading cuts often create a tangled, shaded mess in mature trees.
- Thinning Cuts: This involves removing an entire branch right at its base (where it meets another branch or the trunk). Thinning cuts open up the canopy to light and air without triggering explosive, bushy regrowth.
The Golden Rule: When in doubt, thin. Most mature fruit trees need plenty of thinning cuts to maintain airflow and very few heading cuts.
Step 5: Young Tree Training (Years 1 to 3)
If you have just planted a new tree, your priority is structure, not fruit. It can be heartbreaking to pinch off early blossoms, but allowing a young tree to bear heavy fruit can permanently warp its fragile branches.
Spend the first three years establishing the architecture you chose in Step 2. Select 3 to 5 strong, well-spaced branches to act as your permanent scaffolds. Remove aggressively competing leaders, branches with narrow or weak crotch angles, and downward-facing growth. Early structural training saves you decades of difficult corrective pruning down the road.
By following the tree’s natural biology and focusing on light and airflow, you are setting your orchard up for a lifetime of success. A well-pruned fruit tree may produce fewer pieces of fruit overall, but the harvest you do get will be substantially larger, healthier, and vastly superior in flavor.